Bean Selector
Processor Expert | View | Bean
Selector Bean Selector shows supported embedded
beans including CPU beans and bean templates. It lets the user select
a desired bean or template and add it to the project. Two filters could be applied on the bean list. They could be switched
on/off by clicking on two buttons on the bottom bar. The Bean Selector contains the following four tabs
allowing the user to see list of the bean in the following modes: On Chip Peripherals - shows all beans available for the
specific peripherals. All chip peripherals, sorted by name, are listed
in the appropriate CPU folder, depending on which peripheral can be
used. Current target CPU bean is displayed at the top (only if a
target CPU bean is selected). the Bean Selector provides the "On Chip Peripherals"
view for the users, that are not familiar with the beans functionality
yet (but they know the chip peripherals). This page contains all
on-chip peripherals of the selected CPU and for each peripheral list
of supported beans. So it's very easy to find bean, that supports
functionality of the selected peripheral. Alphabet - shows alphabetical list of available beans. The
user can speed-up searching the right bean typing the start of the
bean name on the keyboard. All/CPU and license
filters could be used here like on the other Bean Selector tabs. Keywords - shows alphabetical listing of keywords related to
the internal peripherals. The list of available beans that could use
the keyword-related peripheral can be found under each keyword. All/CPU
and License filters are used here as well. The icon The bean names are colored black and the bean template names are
colored blue. By double-clicking on the bean it is possible to
insert the bean into the current project. The description of the bean is
shown in a hint. The button Quick Help shows short information about function of
the bean. The Quick Help is displayed as a part of the Bean Selector
window and is updated when the user selects another bean in the tree. The pop-up menu is available by clicking the right mouse button on a
folder.
The pop-up menu is available by clicking the right mouse button on a
bean.
The pop-up menu is available by clicking right mouse button on the area
inside the Bean Selector window
The pop-up menu is available by clicking the right mouse button on the
Target CPU folder in the On Chip Peripheral mode. This menu is the same as
the pop-up menu for the target CPU in the project panel. See chapter Project
Panel for details. for details. The pop-up menu is available by clicking right mouse button on the
peripheral in the On Chip Peripheral mode.
There are three different icons of peripheral folders which depends on
the usage of the peripheral.
![]() icon.
icon.
![]() icon.
icon.
![]() icon.
icon.![]() means that there is an available license for the bean. If the icon is
displayed as a "greyed"
means that there is an available license for the bean. If the icon is
displayed as a "greyed" ![]() icon, it means that for the selected bean a valid license is not available.
icon, it means that for the selected bean a valid license is not available.Folder Pop-up menu
Bean Pop-up Menu
Bean Selector Pop-up Menu
Target CPU Folder Pop-up Menu
Peripheral Folder Pop-up Menu
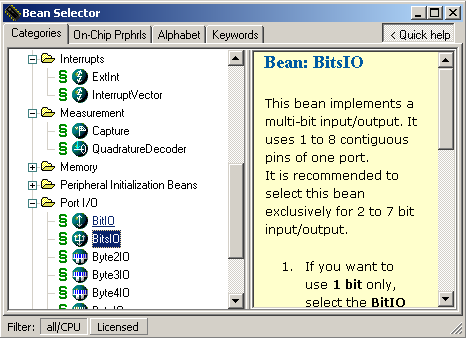
Figure 1 - Bean Selector
with Quck Help panel